Introduction

Welcome to my A2 media Blog, I'm Josh Stevenson (0796) and I'm in Group 2 with Harry Kettenis (0390), Matthew Romo (1660) and Ysabel Hudson-Searle (0331). Use the labels on the right to navigate through my blog, with the A2 labels relevant to my current course. You can access the main music video blog aswell using the link.

Here is the live link to Group 2's Facebook Page.

Thanks.

Music Video

Our Music Video

Digipak


Our Digipak
Top Left: Back Cover, Top Right: Front Cover
Bottom Left: Inside Back, Bottom Right: Inside Front

Our Website


Our Website (Click to Enter)

Friday, 19 December 2014

3) What Have You Learned From Your Audience Feedback?

At the start of the project we did a lot of research into our target audience, so that we made a music video which appeals to them and plays into their interests.

In order to collect feedback from our target audience once we had made the music video, we made an anonymous online survey via "Survey Monkey". As well as continually asking for feedback throughout the construction stages of the project from members of our target audience.

The Prezi below shows a breakdown of our target audience, including both Primary and Secondary audiences:


Audience Feedback: Construction


When we were constructing our three products, we were constantly asking other people's opinions in regards to our work. This feedback had quite an effect on the directions we headed in, because it gave us an objective opinion on our work.

Album Cover

With the album cover for example, when we thought we had finished with the design, we asked for some feedback on how it was constructed. The main point was that they didn't feel a strong link between the front and back covers.

Before feedback (left), After feedback (right)

We therefore made changes to our use of the coloured smoke and added in the gradient background, which creates a very strong visual link between the two and pulls the album together.

Music Video

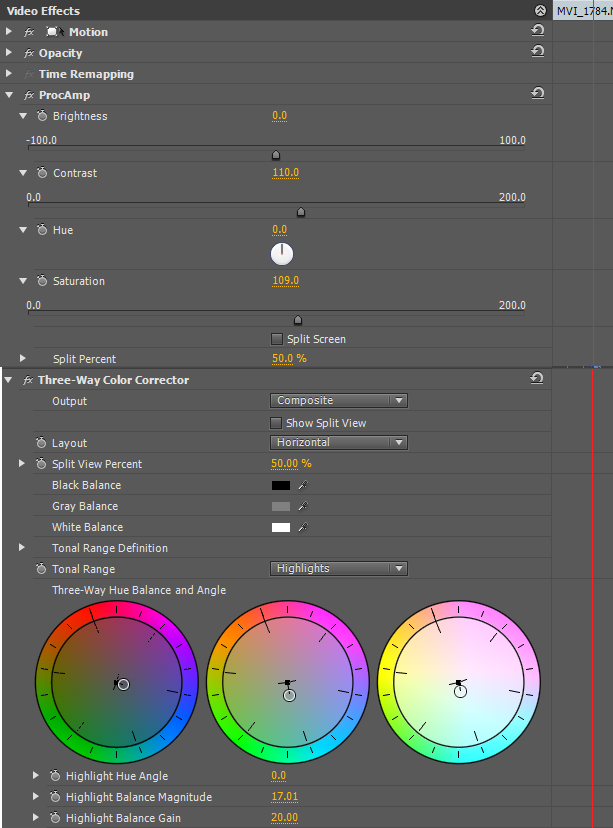
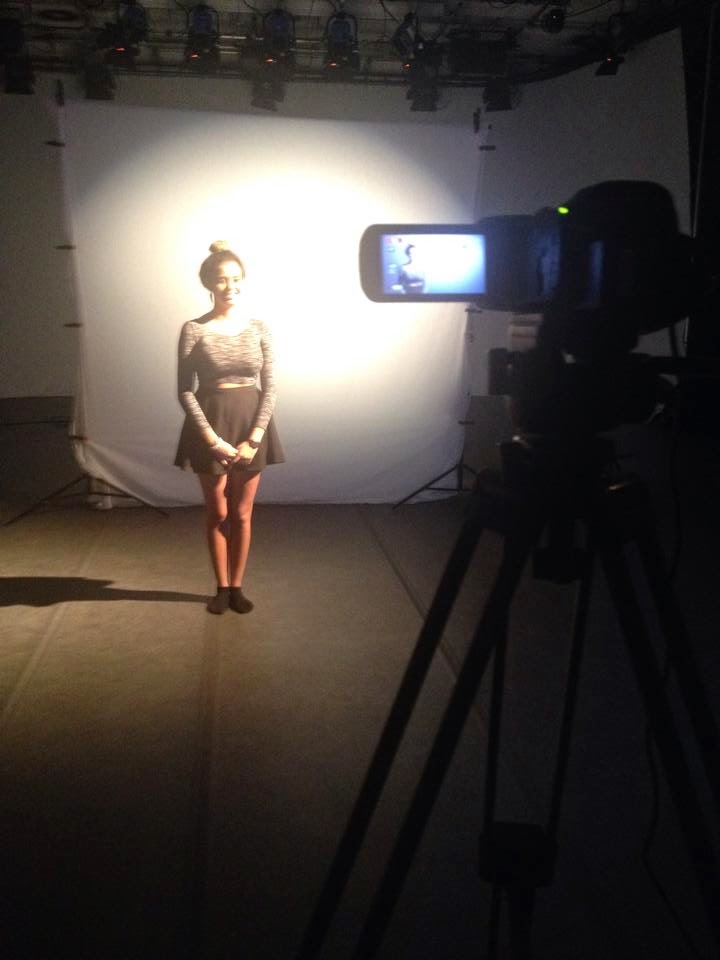
Changes to the music video were a regular occurrence; after making a number of changes, we would then ask for the opinions of other as to how well they worked and what they would do differently. The video below shows a few examples of what was said about our music video during construction.


To summarise the main points we took from this:
-  Put more emphasis on editing to the music, stronger use of fades and cuts.
- The colouring on the narrative doesn't convey that it happened in the past, use effect like grey-scale or sepia.
- The cutting and timing for the hair flick didn't work. Either have it flick all the way or not at all.

Website

Contact page before feedback

One piece of feedback we received on our website, is that generally it's visually pleasing and shows the artist well. However, there are certain expected elements we were missing that stopped it looking professional. Things such as how plain the contact page was, with nothing really other than a form. In order to fix this, we embedded a google map, showing the record label's location and its contact details.

Contact page after feedback  
Audience Feedback: Music Video

To collect audience feedback on our music video, we created a survey using the online questionnaire maker "Survey Monkey"; which can be seen below. Making the survey was definitely a good idea, because it gave us an understanding of which parts were well received and which needed improvement.


Below shows some of the main responses we received from the survey:

1. People understood that the song was R&B (a sub-genre of the PBR&B genre)


Most seemed to make the connection between the song and R&B. There were a few responses that weren't quite able to place the sound of the song with a genre, with some not being totally wrong in saying it was indie.


2. The themes of Relationships and Heartbreak came across well


Near enough all of the responses made some reference to the struggles of the relationship and Roza's reaction to it. A small percentage didn't feel there was a strong theme/message to the video, which may have been because of how visual the music video was, possibly causing the themes to become lost. However, this is purely down to individual interpretations and the majority understood what we were trying to convey.


3. Connection between Narrative, Performance and Concept could be clearer


While audiences seemed to like how visual the music video was, some felt that a few of the concept shots weren't relevant to the rest of the video. We made an artistic choice to incorporate concept into our video to such an extent and these responses we anticipated, because of how much conceptual footage leaves for interpretation. However, now after reading people's responses, I see that perhaps we didn't think about how these shots would be received by audiences objectively enough.


In addition to the survey, we interviewed a few members of our target audience, asking them their honest opinions of the music video and seeing what they really thought. Their responses can be seen below:


The main points I took from this are that:

1. People enjoyed how visual the video was, it peaked their interest and engrossed them.
2. Roza's strong and independent personality comes across well.
3. The message of the narrative was clear to audiences and they understood the link between the narrative and lyrics.
4. The mise en scene of the narrative could be improved to enforce the realism of their relationship.


Audience Feedback: Album Cover

When interviewing members of our target audience about our music video, we also asked them about what they thought of the album cover design. Their responses can be seen below:


The main points I took from this are that:

1. The artist image was well represented in the design.
2. The design is interesting and catches people's attention.
3. The album looks professional and is well put together.
4. Important information i.e. the track list, could be made clearer.

Audience Feedback: Website

Questions were also asked about their opinions of the website, when they were given a chance to interact with it. Their responses can be seen below:


The main points I took from this are that:

1. The countdown was effective in encouraging purchase of the debut album.
2. The interactivity of the website worked well to aid navigation, but the website could be made more so.
3. Looks professional due inclusion of expected features e.g. social media, purchasing.
4. Artist biography could exclude certain audiences. It perhaps should have been more generic.

Audience Feedback: Combination of all products

At the end of each session, we asked them a final question on how well they thought all three products worked together. Their responses can be seen below:


It was a general consensus that all three products worked well together; with the use of iconography and colour making for a very synergistic range of  products. As has been previously stated, a synergistic approach to the project was our aim; the feedback received makes a strong case that our aim has been achieved.

Top 3 Positives I Took From The Feedback


1. Roza's artist identity and brand comes across strongly in the music video, website and digipak.
2. We effectively created three products that are synergistic.
3. The visuals in the music video are engaging and increase interest in Roza

Top 3 Changes I Would Make In Hindsight

1. On the album digipak and website, the artists's style were put ahead of practicality i.e artist biography, (website) and track list (album digipak). It may have been a better choice to go for a more generic style, in font choices (track list and lyrics) and content (biography).

2. The narrative could be made much clearer and realistic if the use of mise-en scene were improved.; taking much more care to dress the set to denote a young couple.

3. I would try and create more of a link between some of the conceptual shots and the performance footage; perhaps by being more specific in the type of conceptual shots or making more use of integrated concept/performance clips.

Thursday, 18 December 2014

4) How Did You Use New Media Technologies In The Construction And Research, Planning And Evaluation Stages?

Use of new media technologies was crucial throughout he project; helping us to communicate with one another and keep each other informed, as well as to actually create our three products. It was only possible to create these products because of these new technologies and the various opportunities they give us

Research and Planning

Web 2.0

- Facebook
At the start of the project, we made a Facebook group specifically for us to use as a means of communication. It allowed us to share ideas, images and documents needed throughout the course of the project with each other. Everyone had access to the group and was able to keep track of the project.
Facebook Group
Agenda set by Harry

We found it really useful, because at the start of each week someone would post an agenda, stating what we want to accomplish by the week's end. It was a great tool to use for setting goals and helped us to all work towards the same objective.


Feedback via Facebook


There were times when one of us had made progress with the planning and needed feedback on it then and there. If we weren't together as a group, then they would post it and the others would give their thoughts.


- YouTube
You Tube playlist


We would constantly be on youtube during the research and planning stage, looking for ideas for our proposed music video. It served as a plentiful source of inspiration, allowing us to organise all of the videos we liked elements of into a playlist of our inspirations.

-Blogger

At this stage in the project, we were all still getting to understand the rest of our group's trail of thought. If you were to look at all of our individual research, while there were some very similar elements to each of our ideas, there were also some stark differences in the types of videos we each wanted to make. Blogger was really useful in finding out what we all did and didn't like in music videos, because we were able to see the directions each person wanted to take. Then allowing us to blend the various ideas together to a concept that we were all happy with, that emphasised the elements we all agreed on from the outset.

Posts on group member's blogs, showing video ideas

Mobile Phones

All of us in the group had some form of smart phone, which allowed us to make full use of these technologically converged and web 2.0 integrated devices. They gave us access to the Facebook chat, Whatsapp and Imessage groups, meaning that we were able to communicate with one another at the push of a button.
 Imessage chat (left), Whatsapp group (right)

They were especially useful when planning out different locations for shoots, allowing for us to make judgements on the suitability of the location by seeing images and videos of the location.


    Image and video sent to group chat from mobile of locations

Construction: Production

Canon Legria HFG30
Legria HFG30 in use
In the early stages of construction, we used the Canon Legria HFG30 for all of our location shots. It was perfect for the location shots because of it's portability and ease of use, which made shooting in crowded areas of central London very simple. Unfortunately, there were various piece of footage which we were unable to use do to the lighting we wanted for the shot. Many of our central London shots called for low key lighting, relying solely on natural and public lights (street lamps etc...), which the Legria didn't handle well, adding a large amount of grain into our footage; so much so that even upon editing, the quality was too low to use.

We also used it for the first couple of shots in our studio sessions, which although was a much better quality because of the controlled setting; it still lacked in quality when shooting our fire projection footage, due to low light levels. It is a shame, because overall it is a very good piece of kit, it just wasn't the most suitable choice for what we planned to do.


Go Pro

Go Pro in use


We had planned a variety of slow motion shots and time lapses, the best option for us was to use the Go Pro, with it capable of shooting at a frame rate of 120 fps. There were some restrictions to it, such as the lack of zooming capabilities and it's interface not being the most practical, but we were able to get over these and capture stunning slow motion footage.


Canon 5D Mark 2
5D Mark 2 in use

The Canon 5D Mark 2 was our choice of camera for the majority of the construction stage as it shot in 1080p HD quality and allowed us to manually focus our shots. Admittedly, this did cause some shots to take that much longer because none of us were used to manually focusing a camera. It was a really useful piece of equipment, because it gave us total control of all photographs and footage taken. Even though we were apprehensive about using it, once our technician showed us how to adjust different settings, like the white balance and exposure, we made full use of these skills and took some high quality footage.


Projector
DIY Engineering used


We were really keen to make full use of fire projections in our footage because of the meaning it adds to our performance shots, meaning we needed to use a projector to not only create the effect.There was some hesitation with this, because the projection would have to be the sole source of light in the shot, or else the fire would become unclear. All things considered, with the help of our technician, we were able to find a really good medium between the brightness of the shot and how clear the image appears. There was some DIY engineering needed in order to get various compositions, because of the limitations of using a projector and it did take up quite a bit of our studio time, but it's all a learning experience.


Lighting Desk

Harry programming in our pre-sets
The Leapfrog Lighting Desk, which controlled the Arri 1000k Lights with colour filters connected to the studio's lighting rig was used for the duration of the construction stage. This was all of our first time using a lighting desk, so our technician showed us how to full control the studio lighting rig before we began shooting. On that occasion, we were given the chance to pre-programme some of the lighting set-ups we had planned out and try out different ideas we were thinking of using, Having the skills to control the lighting enabled us to have full control over the lighting we used for our shoots and provided quite a lot of enjoyment for everyone in my group.

While the lights were quite enjoyable to take control of, this was the most time consuming element in our shoot. On one occasion, it took us nearly 2 hours to set-up the lighting because the studio was in constant use by other groups.  Although very laborious at first, it is just a matter of experience and this set-up time decreased rapidly once we grasped what lighting positions were required for each effect.

Construction: Post-Production

Premier Pro

When editing our collected footage together, Premier Pro was our first port of call. While this wasn't our first experience using the software, as we had all previously used it for coursework, some in our group were much less confident using it than others. Due to it allowing for non-linear editing and it's multi-track layout, it was the perfect piece of software for the job, allowing us to continually make adjustments to the sequence and have total freedom with our creative decisions.

Multi-track, non-linear editing

Cross Dissolve effect
This was a great learning curve for me, because it gave me the opportunity to try out a variety of effects, from overlaying footage, to cross-fading tracks. Although quite simple techniques, I have learnt the importance of understanding how the effect works; there were various occasions when I added in a cross fade to footage on 2 tracks at the same time code and wondered why it faded to black.


Grading in Premier Pro
The grading for the majority of our footage was also done in Premier Pro, using "Three-way colour corrector" to adjust the colour balance for the footage, and "Procamp" to make changes to the shot's brightness, contrast and saturation. It was a very long process, because even though certain pieces of footage were of the same shot, they were not necessarily shot on the same day; meaning that the grading for each clip used had to be tailored to that specific clip. We didn't have the luxury of perfecting the grading for one shot and copying it over to every other clip used of that shot. Never the less, once we had finished grading the entire video, we were able to see how well all of that worked had payed off.

After Effects

Our use of After Effects was kept to a minimum for the simple fact that it wasn't suitable for the vast majority of our footage. We did however make use of it when grading our Silhouette performance shots, because Premier Pro didn't allow us to alter the image to the extent required. While I did have some prior experience using After Effects, Harry and Yssy took charge of grading using After Effects, because our technician walked them through using "Colour Finesse".

After Effects full interface


Photoshop


Everyone in my group had some prior experience using Photoshop, both during and outside of the media course, so while there were some elements that were new to us, there were no issues when it came to editing the promotional shots, creating our digipak and making images and specific elements needed for our website. My use of Photoshop was predominantly linked with the creation of our digipak and merchandise for our website. One thing which none of us had experience with, but was of great help, was the skin smoother pre-set. This was programmed by our technician and therefore not standard on Photoshop, so we were talked through how to use this effect. In many of the close-up images, imperfections in the skin were accentuated and made even more noticeable; this allowed us to rectify these imperfections and "smooth" out the skin, as the name suggests.


Web 2.0

- Wix

Wix was used when creating our website. Wix is a free web-based website makes, which allowed us to design and publish our website for our artist, Roza. Matt was mainly responsible for our website, however there were various occasions when we could all be working on Wix as a group. Using Wix we created various pages on our website, each serving a different purpose and encouraging audience interaction.

Header with links to different pages on website

Twitter feed on website
As Wix is a web-based platform, it is integrated with the various other platforms on the web, one of the most important for me, was the integration with social media platforms. This enabled us to design Roza's website to act as a central hub for all of Roza's online activities. Bringing the Twitter and Instagram onto a single page and bringing the website to life with various Icons, live feeds and interactive elements. Wix also creates a mobile version of the website, which plays to the proliferation of technologically converged, web enabled portable devices, making our website even more accessible to potential audiences.

Wix's downfall is the fact that we don't have the freedom of creating java based animations as it isn't compatible, as well as the formatting of website made on Wix being slightly "clunky". While we are able to move objects around on the page fairly freely, it is a nightmare getting the header and footer to the correct proportions.

-Twitter

With the proliferation of technologically converged portable devices, audiences are capable of accessing social media platforms anytime and anywhere. Due to this fact, it was a no-brainer for our group to create an account for Roza on one of the most globally popular social networks, Twitter. Roza's twitter account serves as a direct link between audiences and the artist, giving live updates on the star's current activities and goings-on. Roza's twitter account links directly to our website, having a live feed on one of the pages. Therefore serving two purposes; building a bridge between audience and artist; and encouraging audiences to become more involved with the artist by visiting the website.

Roza's Twitter Page
Roza's Instagram Page

-Instagram

Being a teenager myself, I am fully aware of and interact with the public sharing of images via the social networking website, Instagram. There has been a move from text based communication to a non-verbal conversation which is purely driven by visuals. Roza's Instagram page acts as another voice for the artist, by which the audience are able to learn about and connect with Roza as a person. We were constantly updating the Instagram page with exclusive behind the scenes images and never before seen images of Roza in setting other than in a studio.


Evaluation


Web 2.0

- Prezi

Using Prezi to create a presentation
Prezi enables me to create a presentation online, which can then be embedded onto my blog; which is a very useful tool, as it is a good way of presenting information, rather than having it as a continuous block of text broken up by a few images. Prezi has various pre-set templates, which makes my presentation both interesting and engaging for those who read it. Throughout my evaluation, prezi is a web tool which i have made full use of when answering the questions; bringing together text and relevant images in a direct, neat format.


-Blogger
Using Blogger to answer evaluation questions

Blogger has been at the centre of this project, showing the various decisions made throughout and demonstrating how these were affected by my understanding of the music industry. In the evaluation stage of the project, Blogger has been used to convey my responses to the various evaluation questions and tie them in with the rest of my project by embedding elements of work from other websites. Without Blogger, I wouldn't have a suitable platform to display my work throughout and show my thinking process. Although Blogger has been a great asset to my project, it hasn't been easy to format my work in the way I want, often having to settle for large gaps in my work, rather than having it as organised as I would have wanted.

- Padlet


Padlet  is just one of the web tools used in my evaluation to present information in an interactive and interesting way.

Use of Padlet in evaluation

- Imgflip

Imgflip is an online youtube to gif converter. I used it to make my blog very visual, giving short clips that can be used to express the points in my evaluation answers.

-Survey Monkey

Survey Monkey is a web-based surveying website, which allows us to create and distribute custom made surveys onto different social platforms. When gathering audience feedback, it was essential that we heard the opinions of as many people as possible, in order to get an image which is representative of people's true opinion on our music video. We made a survey of 10 questions to try and gauge the public's views, with questions like "How old are you?" to figure out the demographic of people responding to the survey and "What genre of music do you think this music video is for?" to see their views. Our survey can be seen below:


Create your free online surveys with SurveyMonkey , the world's leading questionnaire tool.


-Cannon Legria HFG30


Filming feedback

Collecting feedback from audiences was a big part of the evaluation process, asking people's opinions and making conclusions based on those opinions. To do this, we recorded their responses to set questions using the Legria FG30; which made the whole process really easy transferring all of the footage to a computer to be edited, due to it being digitally integrated.


-Premier Pro

Once we collected all of the footage, we then used Premier Pro and its non-linear editing capabilities to edit together a collective audience feedback video. This made it easy for us to find general trends in any audience feedback and get a clear image of people's views.

Wednesday, 10 December 2014

Editing Publicity Shots

Matt and Yssy were predominantly the main editors for the promotional shots, with Harry and I chipping in every now and again when there were specific shots that we needed, that hadn't yet been edited. Adobe Photoshop ended out being a god send for our group, because some of us aren't the most confident in using the software; but everyone was given a chance to get to grips with editing images on its simple and easy to use interface.

One of the re-occurring issues we encountered when editing the shots, was Yssy's curly hair. Since the background for many of the original shots wasn't pure white, we needed to crop Yssy out of the shot and place her image onto a plain white background. However, because her hair is so curly and naturally spreads itself out and the very light colours in the tips of her hair, it was difficult to do so.

Quick selection tool


Our first step was to use the "quick selection" tool to highlight all of Yssy and separate her from the off-white background. This wasn't easy because of her hair, as Photoshop continually missed out the lighter parts of her hair, because it couldn't separate the colour of them and the background. 


Refine edge


To make sure that Yssy didn't look like we cut off a chunk of her hair with scissors when we place her onto a white background, we used the "refine edge" tool. This allowed us to increase the contrast in tones in the end of her hair and differentiate her hair from the background and fade out where the image crops the hair, to give it a natural point where it ends.

Before (Left), After(Right)


Once we had managed to give the crop of the image a neat finish, we placed her in front of a plain white background. This then gave us a blank template which we were then able to make adjustments to various elements of the images, such as colour, brightness and contrast.


Brightness and Contrast


In a lot of our original promo shots Yssy blends into the background way too much for our liking, because of our lighting on the day of the shoot. To bring her into the forefront, we adjusted the contrast and lighting to levels we were happy with.


Colouring


The next step for us was to address the unnatural skin tone this gave Yssy, which was very simple to rectify. Adjusting the colouring of the shot to give Yssy a warmer complexion rather than the grey tones wasn't a challenge.


Spot heal tool


In some of the tighter shots where Yssy's face is much more visible, we used the "spot heal" tool to blend any blemishes present into the face and make them less visible. We also used a preset known as "skin smoother" to iron out any discolouration to the skin and give it a much smoother look.
Adjusting rose


With some of our shots, there were specific elements which we weren't happy with. In this image for example, we wanted the rose to stand out more in the shot and have a much more intense colour. This was easily done, using the "quick selection" tool to highlight the rose and the adjusting the colouring of
the selected rose.

Grading

After finalising the order of our shots and seeing the resulting product, we're happy with the progression of the music video. We then moved onto grading the shots in our music video. Below is an overview of the grading throughout the entire video. The left hand side has the grading, while the right hand side is ungraded to show a before vs. after comparison.


Grading for "Wet performance" shot:


Graded (left), Ungraded (right)
Something which we noticed when grading this shot, is that the colours are quite dull, making Yssy look grey and lifeless. It was simple to rectify this, increasing both brightness and contrast and using three-way colour corrector to restore the colour to Yssy's skin and hair. The overall look is one that is very much stripped back, showing Roza in her most vulnerable state.
                     
ProCamp & Colour Corrector                                


Grading for "Fire performance" shot:


Graded (left), Ungraded (right)

The Fire performance shots are meant to smack the audience right in the face, showing Roza as she fights back against the emotions and frees herself from the chains of relationships.

Our footage has the vibrant colours we want, but it is extremely dark, this mainly being due to the constraints of us opting to use a projector to light the shot. The issue we faced, was trying to maintain the colouring of the shot. while increasing the brightness. However, every time we increased the brightness to a level we were happy with, the shot would get whited out to a great extent. We managed to find a medium between the two using Luma corrector, ProCamp and Three-way Colour corrector that we were all happy with, that looks very good.

ProCamp, Luma Corrector & Colour Corrector


Graded (left), Ungraded (right)
The grading for the close-ups were that much more difficult because of how close Yssy had to be to the projector, meaning that these shots were much brighter than other compositions. The main issue, is that by decreasing the brightness you lose the intensity of the flames; which dampens the meaning behind the shot.

To counteract this, you can see what we used Luma corrector, as can be seen below:


Luma Corrector

Grading "Silhouette Performance" shots:

Graded (left), Ungraded (right)

The best way for us to grade these shots, was to use Color Finesse on adobe after effects, because of the variation of shades of black, white and grey. Color Finesse allowed us to be precise in our editing of the colours and make slight. but noticeable adjustments:


Color Finesse

Grading for "Rose performance" shots:

Graded (left), Ungraded (right)


Graded (left), Ungraded (right)
Very little needed to be done to this footage, with the only element us not being totally pleased with is the colouring to Yssy's skin and jacket. They are much brighter than what we wanted. The rose performance shots are much more aggressive than the other performance shot; so while we don't the shots to look totally dead, we also do not want the colours to convey a cheery and joyful atmosphere.


Turning the brightness down was the first obvious step, while then adjusting the saturation to counteract the inevitable graying of  of Yssy's skin tone. After this, we were all happy with the colouring of the footage and decided to leave it there.

           
ProCamp        


Grading for Narrative shots:


Graded (left), Ungraded (right)


Graded (left), Ungraded (right)


For the Narrative shots in the house, near enough no grading was needed. We wanted the shots to look as natural as possible and the best way to do that is to leave the footage as is in terms of colouring; there were no major flaws in the footage that we absolutely had to fix, so we left the footage as is. 

We wanted it to be clear to audiences that the narrative shots are memories, without losing the natural tones of the footage. We thought that the best way to do this, would be to put a vignette over the clip, which gives that slightly faded effect over and around it.


Adding Vignettes to footage


Graded (left), Ungraded (right)

The narrative shots in Trafalgar square required us to take the footage into Adobe After Effects in order to remove the vast majority of the grain.

Removing grain in After Effects

Other than that and placing a vignette over the clip to show it is a memory, only slight colour correction was needed because of where the footage was shot.
ProCamp & Colour Corrector

Grading for Club Shots:


Graded (left), Ungraded (right)
Although very slight, we did make some adjustments to the colouring of these shots. Mainly using Procamp to make the shot less blue and more purple-ish to give it the look of club lighting, rather than it just being dark.
                               
ProCamp & Colour Corrector                                        


Grading for Dance shot:


Graded (left), Ungraded (right)


We only used Procamp when grading the dance shots, because from the start we decided that these clips would be in black and white to work in tandem with the Wet performance shots.

We quite liked the idea of trying to keep in some of the dancer's features, to make her seem like a person, rather than just a dancing figure. The fact that the dancer is a female gives the impression that it's a reflection of Roza, which is why we wanted to keep some life in the shot.

We turned the saturation down almost as far as we could; while increasing the brightness to make the background completely blank and increased the contrast high enough, so that the glint from the light hitting her skin is still present.

ProCamp


Grading for Other Concept shots:


Graded (left), Ungraded (right)
This show was simple to grade, using the "black and white" preset in Premiere Pro to remove the colour from the shot. Having the shot in black and white was a decision made as a group to objectify person as a canvas to show the progression of Roza's relationship.


The next 2 shots were left ungraded, as we were all extremely happy with the look of the footage. We were pleased with the effects the lighting used in the shoot gave and felt that adjusting the colours or look of the shots would in fact detract from them.
Drumming Shot
Hair flick Shot